Methods
Using equal parts science, technique, and inspiration, Patricia Jahla discusses the process and methods to build her sensuous forms.
Making the Clay
Having used two kinds of clay in recent years, I’ve returned to digging and refining my own native porcelain from the Laramie Formation, late Cretaceous period, on the front range near our former home in Monument. While both the native porcelain and the commercially produced clay I had compounded to match it in color are white, very smooth-grained and remain white when fired, the native porcelain I dig myself has better plasticity that forms easily without cracking, superior wall strength, and excellent re-wetting characteristics, all crucial to hand-building artists.
Digging my own clay, while laborious, is another connection with the earth that provides my materials – and you just can’t beat the plasticity of clay that has aged in place for roughly 66 million years! After digging about 500 pounds of dry clay, three times per year, I soak the dry batch of clay in water; stir vigorously with a paint mixer; and strain out most of the silica sand, rocks, and all undesirable debris using a hand-cranked sieve. The resulting slurry resembles super-smooth, thick vanilla pudding. It is spread out on plaster batts to dry, and when workable, it is kneaded, de-aired, and stored in uniform blocks of about 20lbs. each in heavy plastic bags. About 40% of the original weight is waste sand, larger rock chunks, twigs, etc. So – a LOT of work. Is it worth it? I think the results speak for themselves.
Forming the Base
The base can be formed in several ways: coiled free-hand, thumb-pressed out of a ball held in the opposite hand or formed into a pre-fired mold (as the Pueblo potters do) called a “puki.”
Allowed to set up fairly firmly, the edge must remain pliable to receive the subsequent layer or “coil.” A foot may be added at this point. If the finished form is meant to be symmetrical, it is critical to make sure this part is as perfect as possible. Tricky since I don’t use a potter’s wheel. Turning my small banding wheel allows me to gauge the symmetry of the piece by eye.
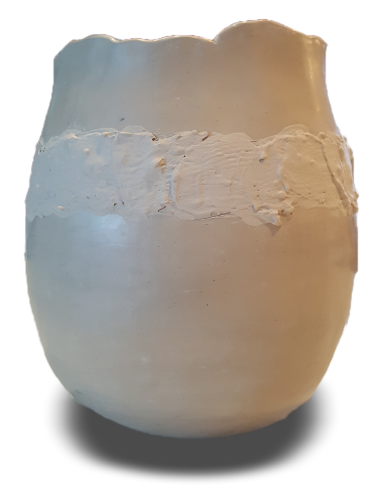
Adding Coils
My favorite formative method, coil building, is probably the oldest form of pottery construction there is. Coiling is a slow, contemplative process, but for that very reason can be controlled and adapted to shapes which would be more difficult to achieve on a potter’s wheel. In many regards, coil building bears a strong resemblance to sculpture. Once I learned this technique from my Pueblo artist friends at Crow Canyon, I dismissed thoughts of returning to wheel throwing.
The edge of the existing form must be thoroughly scored and thick slip painted on the top edge to assure the subsequent coil will adhere when pressed into place. The slip can be made with some vinegar in addition to the water in order to improve plasticity and adhesion.
Pinching Up the Wall
Roll out a coil of clay of a uniform diameter, long enough to make one circuit around the perimeter of the piece. The added coil is pinched into place in one circuit around the piece, then thinned and pulled up in two or more passes around the circumference. It’s essential to keep the thickness of the wall uniform. If the rim becomes uneven, it can always be trimmed off.
Paddling the Wall into Shape
Paddles with different profiles are used to adjust the curvature of the walls until the desired shape is achieved. The opposite hand acts as a sort of “anvil” inside the piece to limit movement, since the clay is still quite pliable at this point. Then surfacing tools are used to scrape the exterior wall smooth. The piece must be allowed to dry somewhat before the interior wall is smoothed. Interior wall smoothing is critical, even in a closed form, since when drying and firing, irregular wall thickness will “telegraph” to the exterior and become visible in the finished work. Uneven wall thickness also causes uneven drying and, potentially, cracking.
Formed, Smoothed, Ready to Burnish
Once formed, the ware can be sanded if necessary, but it must be slightly damp at least on the surface, in order to burnish with a smooth pebble.
Burnishing creates a tight, uniform surface. I then apply a very thin, fine slip called terra sigillata (sealed earth) either with a large, soft brush or by air brushing it onto the bone-dry greenware in 2-3 light coats, allowed to dry thoroughly between coats.
The dry surface can then be buffed with a microfiber towel or a piece of very smooth plastic wrapped around the fingers. This causes the clay particles in the slip to lie flat.
Bisque Firing
Once totally bone dry, the pieces are placed in the kiln for a bisque firing. Unlike service ware, the bisque temperature for my current firing method is actually much higher than the “color” firing. The bisque firing reaches 1823°F. This firing is sloooow, passing 2 critical temperature points very, very carefully. One is where chemically combined water is driven out of the clay, about 451°F, and the other is called the quartz inversion at 1063°F where the shape and size of the silica molecules in the clay change radically. The target firing temperature of 1823°F takes a minimum of 10 hours to reach in my kiln, longer from a cold start. The kiln is shut down with all air access closed and allowed to cool as slowly as possible – this generally takes even longer than the firing process.
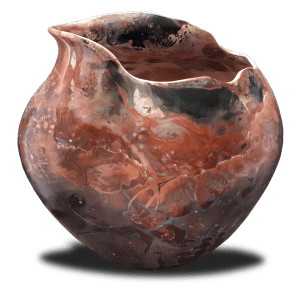
Fumed Saggar Firing
Fumed saggar firing, the method I employ most often now, is a 2-firing process. The term “saggar” refers to an enclosure for the piece of pottery. Invented hundreds of years ago in Asia, the original use was to keep fly ash from the wood-fired kilns from landing on the molten glaze and causing unwanted flaws. The modern use is just the reverse – to capture the firing atmosphere inside the saggar and force it to work on the surface of the piece. The bone dry, unfired, ware is air-brushed with several light coats of terra sigillata, buffed to shine, allowed to dry again to bone dry, and slowly fired to about 1825°F. The kiln is allowed to cool very slowly and the pieces removed. Then, as if they were a blank, white canvas, the coloration process begins!
Preparation for Saggar Firing: Adding the Color
I pour ferric chloride, a liquified iron source, into and onto the bisqued piece, then while still damp enough to allow adhesion, sprinkle a little bit of sugar onto the curves I want to highlight. Fine copper wire can be draped around the form, as well as horse hair, and some combustible materials dropped inside or placed outside around the foot of the piece.
Making the Saggars
Large sheets of aluminum foil are crumpled up, then uncrumpled and wrapped tightly around the form, being careful to seal up every access to retain the firing “atmosphere” inside the foil. The sheets of foil act as the saggar (literally “enclosure”) to trap the firing atmosphere inside the piece. The ferric chloride heats and catalyzes the combustible materials inside the foil, causing chemical reactions to draw on and color the form. There is no brush application of color or direct control over the design at all, so the visual results of this method are pretty much a gift from God out of the kiln fires – a good metaphor for life itself!
Once thus prepared, the work is loaded into the kiln and re-fired, this time to about 1260°F, on a very carefully staged temperature plan. When cooled, the foil is peeled off, the ware cleaned up with water and a soft brush, and then the dry surface buffed vigorously with hand-applied cold wax to achieve the butter-soft gloss surface which is so inviting to the touch.
Finishing
Once the saggar firing kiln is slowly cooled and opened, the burned remnants of the aluminum foil are removed from the forms, which are then gently washed and thoroughly dried. The pieces are then polished with 2-3 coats of cold hard wax.
Saggar firing does not render the work entirely water-tight, so fresh flowers are not advised. Nor can pieces fired in this manner be used for cooking.
But silks or dried flowers would be wonderful, or you can consider the piece to be finished art by itself, like sculpture, needing no further adornment.